Showing posts with label Recipe. Show all posts

Thursday, February 25, 2016

VASILOPITA – GREEK NEW YEAR’S CAKE


I have great news! I have secured good luck for 2009. January 1st was my husband’s ‘Name Day.’ In Greece, everyone celebrates the “Name Day” of the saint that bears the same name. According to the Orthodox Church, every day of the year has been dedicated to the memory of a Saint or a martyr from the Holy Bible and Holy Tradition. In Greece, a person’s name day is even more important than their own birthday and is celebrated with attention from friends and relatives and often gifts.
My husband Vasili’s Name Day lands on the first day of the year and has a historical tradition. It commenced in the fourth century, when Saint Vasili the Great, who was a bishop, wanted to distribute money to the poor in his Diocese. He commissioned some women to bake sweetened bread, in which he arranged to place gold coins. Thus the families in cutting the bread to nourish themselves, were pleasantly surprised to find the coins. I read that the sweetness in the cake symbolizes the hope that the New Year will be filled with the sweetness of life, liberty, health, and happiness for all who participate in the Vasilopita Observance.
Below is a recipe for a traditional Vasilopita cake. One coin is dropped in the batter of a round pan. The person who finds the treasure in his or her slice of cake is said to be blessed and will receive good luck for the coming year. I squealed when my fork found the coin in this light, simple but delicious yellow cake.
Vasilopita – Greek New Year’s Cake
Serves 15-20 people.
4 cups flour, sifted
6 teaspoons baking powder
1 teaspoon salt
1 cup butter
2 cups sugar
4 eggs
1 1/2 cups milk
Grated lemon rind from 1 lemon
Confectioners Sugar
Silver or gold coin (soak in water and soap to clean. $1 coins are fun!)
Preheat oven to 350 degrees. Sift flour, baking powder and salt. Cream butter, add sugar gradually; beat together until mixture is light and fluffy. Add eggs, one at a time, beating well after each addition. Beat in alternately until just smooth, flour mixture and milk. Add grated lemon rind from one whole lemon (2-3 teaspoons).
Grease a 12-inch round baking pan and line bottom with parchment paper. You can use a rectangle if you don’t have the large round pan. Put batter into the prepared pan. Drop in a silver or gold coin and bake at 350 degrees for about 40 minutes or until toothpick comes out clean. Cool in the pan. Then, sift confectioner’s sugar over the top. Cut out of pan to serve.
* You can halve this recipe in half and use a 9 inch round pan


taken by : http://whippedtheblog.com/2009/01/04/vasilopita-greek-new-years-cake/

Wednesday, February 24, 2016

THE CARROT CAKE THIEF


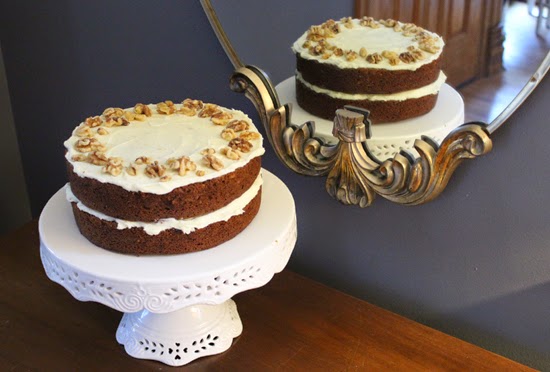
I just came across these photos from April, when I made my husband the carrot cake he had requested for his birthday. When I first posted this recipe, I claimed it was my #1 recipe and a few year’s later, I think it has held its ground. I haven’t met a carrot cake I like better.  The unexpected and time consuming trick is cooking and pureeing the carrots before mixing them into the cake. The pureed carrots make the cake so moist and the added coconut , walnuts and pineapple bring just the right amount of texture and sweetness.
The night before his birthday, I whipped the frosting, baked the cake layers and left them to cool. First thing in the morning, before the kids woke up, I snuck down, brewed a pot of coffee, leveled the layers and assembled the cake. Leveling cakes always leaves a nice mound of scraps that I NEVER waste. I put them on a plate for nibbling.
When Baby Whipped woke up that morning, one of the first things she wanted to do was try out the swim cap and goggles we’d recently bought her. She has a fun spirit and it didn’t surprise me to see her running up and down the halls with her footy jammies, Nemo cap and goggles. It did surprise, some minutes later, to find her laughing with a mouthful of cake.
When I asked her where she got the cake, her eyes twinkled as she waved me towards the kitchen. Though I hoped she had discovered the scraps, the frosting on the corner of her mouth suggested worse. When we reached the kitchen she was more than happy to reenact her crime. She dragged her stool to the counter and stretched her full arm’s length to reach the cake that I had pushed to the far corner.


She was quite pleased with herself.


We often call Baby Whipped “the jolly rascal.” Her naughty behavior is usually funny and sometimes quite clever. Most of all, she is proud of it and exudes such joy that it’s hard to get too mad at her. When we give her “time outs” for being naughty, she does her time without complaining, says sorry and jumps right back in the game. Rarely any whining.
When I came across these photos again, I laughed out loud. These are the memories that I know we will cherish for years. The old baking perfectionist in me didn’t mind the hunk out of the side of the cake one bit. Laughter trumps perfect cake.
Luscious, Moist Carrot Cake
3 cups all-purpose flour
3 cups granulated sugar
1 teaspoon salt
1 Tablespoon baking soda
1 Tablespoon ground cinnamon
1 1/2 cups canola oil
4 large eggs, lightly beaten
1 Tablespoon vanilla extract
1 1/2 cups shelled walnuts, chopped
1 cup shredded coconut
1 1/2 cups pureed cooked carrots
1 small 8 oz. can of crushed pineapple, drained
Cream Cheese Frosting (recipe below)
1/2 cup walnuts for the top (optional)
Preheat oven to 350. Grease two 9 inch cake pans. Line the bottoms with parchment paper. Peel and cook carrots until a fork easily can be poked in to them. One small bag of full sized carrots should yield about the right amount of pureed, cooked carrots. Drain the carrots and purree while still warm in a blender or food processor until they are smooth. Measure out 1 1/2 cups of the carrot puree and set aside.
Sift dry ingredients into a bowl. Stir dry ingredients together with a whisk to combine well. Add oil, eggs and vanilla. Beat well for about 2 minutes. Fold in walnuts, coconut, carrots and pineapple. Pour equal amounts of batter into each pan. Set in the middle of the oven and bake for about 50 minutes or until edges have pulled away from sides and toothpick inserted in middle comes out clean.
Remove from oven and let sit in pans 10 minutes. Turn out onto a rack and cool completely. When cool, level cakes to take humps off the center with a serrated knife. Spread cream cheese frosting between the layers and on top. I leave the sides out in the open because they are a beautiful brown and nice and crunchy. Sprinkle chopped nuts on the top if desired.
Cream Cheese Frosting
(makes enough for middle and top of cake. Double if you want to frost sides)
8 oz. cream cheese at room temperature
6 Tablespoons butter at room temperature
3 cups confectioners sugar, sifted
Cream together cheese and butter. Slowly stir in sifted confectioners sugar and continue beating until incorporated and light and fluffy.


taken by : http://whippedtheblog.com/2013/07/30/the-carrot-cake-thief/

peanut butter oat pancakes with coconut cream


Pancakes are so super delicious, yet so complicated at the same time. I can’t tell you how many times I’ve wanted to share pancake recipes but I ruin every.single.one when I flip them.
I just can’t flip a pancake without popping a hole in it, or tearing it apart, or tossing it on top of another pancake and making to two stick together. Grrr….
All while I love pancakes, I hardly ever enjoy them because of this mess. I like simple and tasty, I don’t care for frustration while waiting, and waiting, and waiting for that perfect time to flip the pancake. That’s what husbands are for. ;)


Last weekend I went to the kitchen, started putting the pancake batter together and when it was all done, I kindly said to my husband, “ok, you go ahead and cook the pancakes while I set up to take some pictures when you’re done”. ;) Here I was thinking I was being sneaky, when actually he was more than happy to help.
What a man I have. We make a great pancake-creating team.


What I liked most about these pancakes was that the peanut butter wasn’t too much. There was just a slight taste of peanut while the maple syrup and apple cider vinegar together created a great sweet texture. I even thought to myself that this batter would make some pretty awesome muffins. That I just might have to try. You can’t ever go wrong with peanut butter.


The coconut cream was just an extra UMPH to the pancakes. You can toss the cream all over the pancakes before eating them, which is exactly what I did after the photo shoot was done. I wanted you to actually see the pancakes, you know what I mean? ;)


coconut cream

Prep time
Total time
Author:
Serves: 2 cups
Ingredients
  • 14oz. can coconut milk; chilled in fridge overnight
  • 2 tsp pure maple syrup or agave
  • ½ tsp pure vanilla extract
Instructions
  1. Add coconut milk into a medium bowl, with maple syrup and vanilla. Beat for about 5 minutes, until mixture becomes thick and creamy. Set in fridge until ready to use.

peanut butter oat pancakes

Prep time
Cook time
Total time
Recipe type: Breakfast
Serves: 6
Ingredients
  • 1 tbsp ground flax
  • 1 cup oat flour (gf for gluten free eaters)
  • 1 tbsp baking powder
  • 1 egg
  • 1 cup almond milk
  • 1 tbsp pure maple syrup or agave
  • 1 tsp pure vanilla extract
  • 1 tsp apple cider vinegar
  • 2 heaping tbsp of all natural peanut butter
Instructions
  1. Add flax, flour and baking powder to a medium bowl, mixing together.
  2. In another bowl, add egg, almond milk, maple syrup, vanilla extract, vinegar and peanut butter. Mix well.
  3. Pour the wet ingredients into the dry ingredients, mixing together with a big wooden spoon. Allow 5 minutes for the batter to set.
  4. Heat a non-stick skillet on medium heat, carefully pour batter into the pan, dividing evenly. Flip after 5 minutes and allow other side to cook for another 5 minutes.
  5. Remove pancakes and enjoy with coconut cream.


taken by : http://lushiouseats.com/2015/03/01/peanut-butter-oat-pancakes-with-coconut-cream/

so good for you apple cinnamon overnight oats {vegan}


Would you believe me if I told you that if someone asked me three months ago if I liked overnight oats I’d say……
“I haven’t tried them”….?
Honestly, I am a big fan of oatmeal, but until a few months ago I have never, ever tried overnight oats. Now, I literally make them all the time. They are too easy!


For someone who packs their lunch for work every day (my finger is pointing at myself here) this would be a fantastic snack for the morning, or afternoon. Normally I have my overnight oats either right after my workout for my breakfast, or if I eat before I workout then I have them after my workout; which would make them my morning snack.
Either way, I normally eat them after a workout. Oats, almonds, apples and cinnamon are all excellent foods which will provide your body with the type of nutrients it needs to help repair muscle fibres after a workout.


You really can’t go wrong with these Apple Cinnamon Overnight Oats they will keep you feeling full for hours, fuel your body right, all while maintaining regular blood sugar levels and keeping your cravings at next to none!
These oats can really be made any way you like – if you don’t like almond milk, use whatever milk you do like. If you don’t like cinnamon – skip it. (But really, who doesn’t like cinnamon?) All I’m saying is that there are so many ways to make overnight oats and none of them are wrong.


This is exactly the kind of recipe that proves you don’t have to skip out on good food in order to eat healthy.
Fuel the fire with overnight oats! As long as you aren’t spiking it full of high glycemic carbs and excess sugar your body will feel nothing but good! ;)


apple cinnamon overnight oats

Prep time
Total time

Recipe type: Breakfast
Serves: 1
Ingredients
  • ¾ cup unsweetened almond milk
  • 1 royal gala apple; sliced into chunks
  • ¼ cup oats
  • 1 tsp cinnamon
  • 1 tsp vanilla extract
  • 1 tbsp slivered almonds
Instructions
  1. Add first 5 ingredients into a mason jar, seal, shake and set in fridge overnight.
  2. Slightly shake jar remove lid and enjoy topped with slivered almonds, or pour oats into a small bowl and top with slivered almonds.


taken by : http://lushiouseats.com/2015/02/17/so-good-for-you-apple-cinnamon-overnight-oats-vegan/

TRIPLE PINK CUPCAKES

Pink Power! For Mini Whipped’s third birthday, we pulled out all the stops to create a pink paradise for her special day.


Clearly, nature has beat out nurture in creating my 3-year-old’s desire for all things pink. None of the main caretakers in her life are “pink lovers” and yet, Mini Whipped is drawn to all things rose-colored like a Goth is to black.
When she started choosing everything pink and wanted to wear pink clothes every day, I tried to encourage some variety. I would suggest other options offering enticing rewards, “But don’t you want this dolphin to swim around on your blue shirt all day long?!”  I rarely convinced the strong-minded tot. Then one day, I heard her saying to her grandmother with heartfelt emotion, “Grammy, it just makes me SO happy to wear pink.”  After that, I gave up my quest to make her a more well-rounded rainbow and gave in full fledged to the pink power.
Someone gave us colored pellets that turn the bath water blue, yellow or pink. The first time she got in the pink bath she hovered to a new elevation of excitement. She splished and splashed singing about her love for the pink water and even carefully leaned down to touch her cheek to the water professing, “I love you pink tub tub.” At that point, I became a proponent of pink love. If something so simple could bring such joy, I figured I better embrace it. Warnings of losing the priveledge of a pink bath have proved to be my strongest disciplinary force yet.
As we planned for Mini Whipped’s third birthday celebration, we decided to do everything we could to create a pink paradise for her. Her Daddy wore his pink shirt to work, Mommy searched her closet for the only pink she could find (in the underwear drawer), her babysitter wore all pink and we bought pink balloons. The birthday girl was thrilled with the idea of red velvet (dark pink) cupcakes with pink frosting and pink sprinkles.  She requested a special pancake and sausage dinner and Mommy even surprised her with pink pancake batter. They didn’t look very appetizing to us but the guest of honor claimed they were the best tasting pancakes she had ever had.


Parenting involves constant learning. My daughter loves many of the things that I do:  swimming, baking, reading and eating. As she continues to develop and grow into herself, I have realized she is going to find pleasure in some things that I don’t. If those things are healthy, I have learned that I must respect them and help her be her own individual.
There are many things a parent will do to give their child happiness on her birthday like go to two stores to find enough pink food coloring, wear pink underwear and even choke down pepto-bismal colored pancakes while smiling. Happy third birthday my little pink princess. May you continue to find as much easy joy in simple pleasures.


Triple Pink Cupcakes
(red velvet cake with pink cream cheese frosting and sprinkles)
Makes about 18 cupcakes.
2 1/4 cups flour
1 1/2 cups sugar
1 t baking soda
1 t salt
1/4 cup cocoa powder
1 1/3 cups vegetable oil
1 cup buttermilk, room temperature
2 large eggs
2 Tablespoons red food coloring
1 t white distilled vinegar
1 t vanilla
Preheat the oven to 350 degrees. Put paper cupcake cupcakes in a cupcake pan. Sift flour, sugar, baking soda, salt and cocoa. In another bowl whisk oil, buttermilk, eggs, food coloring, vinegar and vanilla together until combined. Mix wet and dry ingredients together in a stand mixer with paddle attachment just until combined. Fill cupcake cups 2/3 full and bake for 18-20 minutes or until toothpick comes out clean. Cool on a rack completely before frosting.
Pink Cream Cheese Frosting
8 oz. cream cheese, room temperature
1 stick unsalted butter
2 cups sifted powdered sugar
1/2 teaspoon red food coloring
Pink sprinkles (optional)
Mix softened butter and cream cheese together until fluffy. Add powdered sugar little by little. Mix in food coloring to desired color. Put frosting in refrigerator until stiff enough to frost the cakes. Be sure cupcakes are cool before frosting. To make a piping bag, cut just a small tip off the corner of a plastic ziplock bag. Fill with frosting and squeeze out in a circular, pinwheel onto the cupcakes started on the outside and circling inward. Decorate with sprinkles.


taken by : http://whippedtheblog.com/2011/04/10/triple-pink-cupcakes/

TREES WITH CHEESE


Though for many of us food is serious business, it is also wonderful how playful it can be. After all, from a very young age, we all have a tendency to “play with our food.”


I am sure I am not the only kid that made up names and stories about my food. The fantasy especially helped the vegetables go down easier. Broccoli florets were trees, cauliflower were my birch trees, brussels sprouts were bushes, cooked carrots became telephone poles and stringy squash made rough telephone wires. The landscape, when arranged appropriately on the plate, most certainly helped the food taste better.
As Mini Whipped enters full toddlerhood, I have tried a number of things to get more veggies down her hatch. Luckily, she isn’t the pickiest of eaters but like most kids, she has her particularities. I encourage her to be playful with her food and the technique seems to be working. She helps me cook regularly and we enjoy gathering ingredients, assessing recipes by discussing the photos in the cookbooks, using the most fun kitchen tools from whisks to citrus zesters and making up stories about what we are eating.
Eating is necessary for sustenance and survival. But, how fortunate we are that we have the luxury to also make it so much fun! For those of us who are writing and reading food blogs, we can be grateful to have enough to eat and to have enough time on our hands to “play with our food.”
Broccoli with Cheddar Sauce
“Trees with Cheese”
6 cups broccoli florets
2 tablespoons butter
2 tablespoons unbleached white flour
1/4 teaspoon dry mustard powder
Sea salt, to taste
1 cup low fat milk
1 1/2 cups sharp cheddar cheese, grated
White pepper, to taste
Steam broccoli until crisp tender, about 4 to 5 minutes. Meanwhile, melt butter in a medium saucepan. Whisk in flour, mustard powder and salt to taste. Gradually stir in milk, whisking over medium-low heat until thickened. Add cheese, stirring until completely melted. Season to taste with white pepper. Pour over steamed broccoli and serve immediately.


taken by : http://whippedtheblog.com/2011/01/17/trees-with-cheese/

TURKEY MEATBALLS FOR NOW AND LATER


I understand the hoarding instinct. Freezing dozens of delicious meatballs for easy, future meals made me feel incredibly satisfied and safe.


Life has been hectic the past few weeks as I eased back into full time work and adjusted to life as a working business owner and mother of two. Cooking dinner nightly used to help me wind down and relax. And, I am sure some day when I get new systems in place, it will again be a pleasure. Unfortunately, I have been so drained the past fortnight that I find myself staring blankly into a full fridge each evening without a drop of culinary creativity. When cooking no longer excites me, I know that my energy is fully tapped. 
I am a solution seeker. The moment something isn’t going right, I begin to problem solve. We have been eating too much take out food and I have baby weight to lose! So, I have come up with a few solutions to my problem.
First, I visited a local butcher and stocked up on lean meats to fill our freezer. I planted three long rows of lettuce, spinach, kale and swiss chard in our backyard and when it matures in the coming weeks, we will simply turn on the grill and eat lean protein alongside garden fresh greens.
I have also decided to use weekends to prepare healthy food for easy, future consumption. Turkey meatballs fit the bill. Ground turkey keeps these meatballs a bit lighter while using dark meats keeps them flavorful. I cooked them before freezing to save even more time during the week.


As I filled freezer bags with dozens of cooked meatballs, an overwhelming sense of satisfaction and calm washed over me. I began dreaming of a second freezer filled to the brim with ready-to-eat foods that require minimal weeknight preparation.
What to do with all these meatballs? Serve them to Mini Whipped with barbeque dipping sauce, mix them with sauce and serve over whole wheat pasta, tuck them in a sandwich  (voice rising, pulse quickening)  my culinary enthusiasm is already returning!
Turkey Meatballs
Makes about 3 dozen
3 slices bread
1/4 cup milk
1 1/2 pounds ground turkey (93% lean, dark meat)
1 small shallot, finely chopped (or 1/4 cup onion)
3 small garlic cloves, minced
2 tablespoons chopped fresh parsley
1/2 cup grated parmesan cheese
1 large egg, slightly beaten
1 teaspoon coarse salt
1/2 teaspoon ground pepper
Place bread in food processor and pulse until it is crumbs. Mix breadcrumbs with milk and set aside while you gather and combine other ingredients. In a separate bowl, combine all other ingredients by mixing with your hand or a fork. Add the bread crumb mixture and combine.
Make 1 inch balls (about 2 level Tablespoons of meat mixture) and arrange them on a baking sheet lined with parchment paper or sprayed with a touch of olive oil. Broil the meatballs in the oven for about 10 minutes, turning them over half way through. Be sure inside is fully cooked.
FREEZING MEATBALLS:
To freeze them raw, place raw meatballs on parchment lined baking sheet in the freezer. After an hour, transfer them to freezer bags. To freeze cooked meatballs, let them cook completely before placing them in freezer bags.


taken by : http://whippedtheblog.com/2011/05/08/turkey-meatballs-for-now-and-later/

Monday, April 27, 2015

SNEAKY STOVE TOP MAC ‘N’ CHEESE


Sometimes resorting to clandestine methods is the best way to get your kid to eat her veggies.


Most kids will scarf down macaroni and cheese. That is precisely what makes it the best vehicle to trick them into eating veggies! I don’t support lying to your children but a little covert kitchen action never hurt anyone. In this case, it might actually benefit the wee ones.
I had heard about people adding vegetable puree to macaroni and cheese so our babysitter and I started experimenting. Most recipes for homemade macaroni and cheese are oven baked and we just usually don’t have the extra time. And, in the 90 degree heat of the summer I do everything I can to keep my oven turned off.
Find the recipe for this Sneaky Stove Top Mac ‘n’ Cheese here at Babble.com. They are featuringdozens of original recipes from fellow mom food bloggers. If your kids aren’t suspicious of green, you can also try mixing in pureed spinach to create Green Monster Mac ‘n’ Cheese. Sweet breads like zucchini bread are another clever place to hide some of the good stuff.


taken by : http://whippedtheblog.com/2011/06/06/sneaky-stove-top-mac-n-cheese/

Sunday, April 26, 2015

THE BEST RUM BUNDT CAKE IS THE EASIEST TOO

After a silly turn of events and a third annual holiday party, it’s been determined that THIS is the winning rum cake.

Two years ago, I was 8 months pregnant when I first attended a friend’s holiday party. It is an annual gathering that includes a competitive white gift exchange and plenty of festive cocktails. Though I stayed tucked in the corner with my big belly for most of the evening, it was a memorably fun evening.
Last year, we were invited to return. I declared that I would make up for the previous year and drink my share of cocktails and whoop it up with the crowd. The hostess asked me to bring the same rum, bundt cake that I had made the previous year. She recounted that after many of the guests had left, she and her houseguests dug into that cake and devoured it before dawn.
This is where the story gets a little hard to understand, unless perhaps you have been pregnant or live such an overly busy life that details fall through the cracks. I had no memory of making the rum cake BUT I did not doubt that I had made the delicious cake in question. So, I searched my recipes and surfed the web for the recipe to see if something rang a bell.
I never landed on any cake that felt familiar but decided to make a rum cake from scratch that looked good and had decent reviews. When I showed up with the cake last year, I admitted to not remembering what I had brought the year before. When we sampled my offering, it was okay but not quite as moist as I like. Luckily, our analysis was in progress when another friend approached. “Did you use the box cake and pudding recipe? Oh, I always do,” she admitted. “That’s the one that I brought last year.” Case: solved!
This year, the original baker of the boxed cake mix based rum cake couldn’t attend the festivities. A quick online searched surfaced many versions of this simple recipe. So again, I brought a rum cake and this time, it was the RIGHT rum cake. Indeed, it is delicious and super simple. Unless you are averse to using boxed mixes, don’t even fool around with another recipe. I did and though it took two years to solve the mystery, we have all agreed that THIS is the crowd pleaser. Case: Closed.
Golden Rum Cake
from Allrecipes.com
1 cup chopped walnuts or pecans (optional)
1 package yellow cake mix
1 (3.4 ounce) package instant vanilla pudding mix
4 eggs
1/2 cup water
1/2 cup vegetable oil
1/2 cup dark rum
1/2 cup butter
1/4 cup water
1 cup white sugar
1/2 cup dark rum
Preheat oven to 325 degrees F (165 degrees C). Grease and flour a 10 inch Bundt pan. Sprinkle chopped nuts evenly over the bottom of the pan.
In a large bowl, combine cake mix and pudding mix. Mix in the eggs, 1/2 cup water, oil and 1/2 cup rum. Blend well. Pour batter over chopped nuts in the pan.
Bake in the preheated oven for 60 minutes, or until a toothpick inserted into the cake comes out clean. Let sit for 10 minutes in the pan, then turn out onto serving plate. Brush glaze over top and sides. Allow cake to absorb glaze and repeat until all glaze is used.
To make the glaze: in a saucepan, combine butter, 1/4 cup water and 1 cup sugar. Bring to a boil over medium heat and continue to boil for 5 minutes, stirring constantly. Remove from heat and stir in 1/2 cup rum.


taken by : http://whippedtheblog.com/2012/12/17/the-best-rum-bundt-cake-is-the-easiest-too/

Breakfast : blueberry cashew beet smoothie


Oohhh how I love kiwi.
The superfood fruit that I just can’t get enough of!
Kiwi carries some awesome health benefits. From consuming kiwi on a regular basis it can improve your cardiovascular health, boost your immunity, improve digestion and create healthy blood sugar levels.
Along with those incredible benefits; kiwi is also known to decrease the risk of cancer and eliminate toxins within the body. All of those are excellent benefits which come along with creating a healthy lifestyle. Plus, not only will you improve your health, but the taste of these kiwi is unreal!
SO delicious.
Especially with a sprinkle of cinnamon………MMMmmmmmmm…..


Sorry about that, where was I?
This Kiwi Coconut Cream Smoothie is just that;
Dreamy.
In the past few months I’ve been drinking more and more smoothies. This has come clear to me now because I easily go through 11oz of spinach in just a few days. Not that I’m trying to become Popeye or anything, I’ve just come to realize I need more greens in my life and I love spinach, so I’m going to eat more of it.
I don’t put spinach in every smoothie – but I do add them to almost every post workout smoothie.
I normally workout 5x a week so that’s 5 cups of spinach just right there. On top of that, I add spinach to my dinners and lunches; along with other vegetables of course. At the rate I’m going right now, soon enough I’ll be heading to the store and buying 22oz of spinach!
:)


There’s more to this smoothie than kiwi and spinach; there’s also a banana in there, and of course, coconut. A cup of coconut dream, some home made coconut cream (SO good!) and a touch of organic shredded coconut all create a delicious coconutty taste. (That’s a word, right?) ;)
The coconut cream does require to be placed in the fridge overnight, so there is a little preparation that needs to be done for this smoothie, but trust me; it’s worth it!
Put in the time and create this Kiwi Coconut Cream Smoothie for yourself; your body will only thank you with an energy boost and hunger satisfaction.


kiwi coconut cream smoothie

 
Prep time
Total time
 
Recipe type: Beverages, Smoothie
Serves: 2
Ingredients
  • For the Coconut Cream:
  • 14oz. can coconut milk chilled in fridge overnight
  • 2 tsp pure maple syrup or agave
  • ½ tsp pure vanilla extract
  • For the Smoothie:
  • 1 cup of coconut cream
  • 1 cup coconut dream
  • 1 banana
  • 2 kiwi; peeled
  • 1 big handful of greens (I love spinach!)
  • 1 tsp + ½ tsp organic shredded coconut
Instructions
  1. To make the Coconut Cream:
  2. Add coconut milk into a medium bowl, with maple syrup and vanilla. Beat for about 5 minutes, until mixture becomes thick and creamy. Set in fridge until ready to use.
  3. To make the Smoothie:
  4. Add all of the ingredients except ½ tsp of shredded coconut into a blender and blend until smooth.
  5. Top smoothie with remaining shredded coconut and enjoy!


taken by : http://lushiouseats.com/category/recipes/breakfast/

PEAR GINGER COMPOTE

There is nothing like a good neighbor. At my office, I have an incredible neighbor a few doors down in my building. He always has a smile, lends me tools, invites me to play hooky from work and go on his boat in warm weather and recently… brought me an enormous bag of pears from the tree in his backyard. For me, a bag of ripe pears is an invitation and challenge to try something new. That evening, while lightly steaming a few of the pears to make baby food, I was inspired to keep cutting, peeling and cooking to make an “adult” version of the cooked pears.
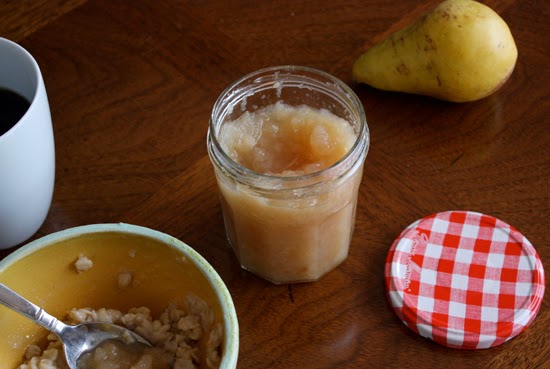
The warming ginger in this compote is such a nice match with the sweet pears. A touch of vanilla made it even more fragrant. When I returned to the office with a few jars of the Pear Ginger Compote, I was again reminded why I so like my neighbor. He was so excited with my creation that he ate nearly the entire jar with a spoon. He went on to suggest that next year we spend a whole day tending to his tree’s harvest and then to head to a farmer’s market with our product… just for one day… just to see what it is like. That idea is right up my alley. Late next Fall, keep your eyes peeled for a readhead with an open hatchback and jars of Pear Ginger Compote.
Although I don’t have the patience for canning, this would make a wonderful gift this holiday if you jarred it and gave it with a few recipes. This compote would be nice with pork chops and tastes great over oatmeal.
Pear Ginger Compote
about 8 cups pears cut in approx. 1 inch cubes
2 Tablespoons freshly grated ginger
1/2 teaspoon vanilla
1 Tablespoon lemon juice
1/2 cup sugar
1/3 cup water
Put all ingredients in a sauce pan and bring to a boil. Reduce heat and simmer for about 30-40 minutes until pears are very tender. Mash lightly with a potato masher to desired consistency. Continue cooking for about 5-10 minutes until some liquid has cooked off.

I put the warm compote in clean recycled jars. It lasted in the fridge for 2 weeks.


taken by : http://whippedtheblog.com/2008/12/13/pear-ginger-compote/

Saturday, April 25, 2015

blueberry cashew beet smoothie


I’m wearing my big smile today as Lushious Eats has officially hit a new milestone. This Blueberry Cashew Beet Smoothie is my 100th recipe!
I honestly can’t even believe there are 100 recipes on this little ol’blog of mine. It really feels like it was just a few months ago that I began Lushious Eats. Really though, this coming June will officially be the first birthday for Lushious Eats.
Mmmm…maybe I shall bake a cake ;)
or better yet, a protein cookie cake. (this did happen, but I’d have to ask my husband for the recipe)
;)


This Blueberry Cashew Beet Smoothie is to die for. Who would have know that beets are like, one of the best tasting veggies; ever! I’ve had beets before, but it wasn’t until I saw this recipe that I wanted to put it straight up in a smoothie.
I went straight to the store and bought 3 good sized beets; so this smoothie will definitely make another appearance or two over the next week in my house.
Along with beets there are also a cup of blueberries, cashews and almond milk. The mixture of these ingredients created a sweet taste but let me warn you now; blend, blend, blend. Otherwise you may not want to drink this smoothie if a) you don’t have any floss b) you can’t brush your teeth right away or c) if you are in public – for all the above reasons.
The mess that these blueberries made in my teeth was hilarious. Let’s just say I was satisfied that I didn’t have to leave the house with blueberry beet teeth.
;)


blueberry cashew beet smoothie

 
Recipe type: breakfast, snack,
Serves: 1 cup
Ingredients
  • 1 medium beet; washed, peeled and cut into small chunks (12 - 20)
  • ¾ cup cashews; soaked for about an hour
  • 1 cup fresh or frozen blueberries
  • 1 cup milk*
  • 1 tsp hemp hearts
Instructions
  1. Add beet, cashews, blueberries and milk to blender and pulse. You may need to give it a few good pulses before blending as this can be very thick.
  2. Blend until smooth and top with hemp hearts.
Notes
*I used unsweetened almond milk


 taken by : http://lushiouseats.com/2015/03/21/blueberry-cashew-beet-smoothie/

THE BEST CHOCOLATE CREAM CHEESE CUPCAKES

Now and then, I settle on a recipe that I feel needs no improvement. This one is joining that privileged club.


It was thanks to an unexpected snow day this winter that we discovered this chocolate cream cheese cupcake recipe. I have long been a fan of baked good with cream cheese and crafted these browniesa few years back but had never found the cupcake version that I felt was perfect. Until now.
When I say that this is a “perfect” recipe, I mean that it is perfect for me. Each of us has a unique palate and preferences. My favorite desserts are a little less sweet and usually include cream cheese, sour cream or buttermilk. Though I love butter in cookies, many of my favorite cake recipes call for oil. And, as a red velvet cake lover, a touch of vinegar in chocolate cake is often a good sign.
If you were nodding your head in agreement as you read the previous paragraph, we may be dessert-compatible. Looking back at my recipe archive of baked goods, I was inspired to make a list of my all-time, never fail, favorite desserts. These are the cream of my crop. No tweaking necessary.
Well, that should keep you baking for awhile!
During our cooped up snow day a few weeks ago,  an unused bar of cream cheese in the fridge inspired this cupcake recipe.  Everyone in the family agreed that these are winners. Not only was the cake moist, the cream cheese filling delectable, but it was nice to skip frosting for a change.
As part of our “keep warm, survive the rest of winter” plan, we are baking regularly. Send me your favorite, never fail favorites to try!
The Best Chocolate Cream Cheese Cupcakes
Yeild: 20 cupakes
For the cream cheese filling:
1 8 oz. package cream cheese, room temperature
1 egg
1/3 cup sugar
1/8 tsp salt
1 cup chocolate chips
For the chocolate cake:
1 cup sugar
1 1/2 cups flour
1/4 cup cocoa powder (use Valrohna – it’s worth it!)
1 tsp baking soda
1/2 tsp salt
1 cup water
1/2 cup oil
1 tablespoon vinegar
Preheat the oven to 350 degrees Farenheit. Prepare muffin tins by lining with paper liners or greasing them thoroughly.
In a small bowl, beat the cream cheese with an electric mixer for a minute. Then add egg, sugar and salt and mix until combined. Stir in chocolate chips and set aside.
In a separate bowl, combine all of the chocolate cake ingredients together at once and mix on medium speed until combined, about 2 minutes.
Fill muffin cups 1/3 full with chocolate cake mixture. Drop a heaping spoonful of cream cheese mixture onto each cupcake.
Bake at 350 degrees for 22-24 minutes until the cakes are just set. Let cool on a rack.


taken by: http://whippedtheblog.com/2015/02/24/the-best-chocolate-cream-cheese-cupcakes/

Friday, April 24, 2015

SOUR CREAM COFFEE CAKE

I hope that good intentions are worth something because my initial plan to bring a warm coffee cake to a new neighbor really was a good idea.


It went a little something like this…  A month or so ago, my visiting mom picked up some new neighbors in front of our house.  The neighbor lady and her mother were out for a walk and were equally as open to communicate with friendly strangers as my mother always is.    Within the first five minutes, we knew that they had just moved back into the city from the suburbs with their three kids and that our parents were both from Michigan. (Hailing from Michigan is common for Chicagoans. Discovery of this common geographic origin often results in a showing of “the hand” and occasionally the name game to find connections.)
I was reminded that when I moved into the neighborhood, I was welcomed with a warm apple, rhubarb cake by my next door neighbor.  It made my week and softened the blow of unpacking all the boxes.  So, I decided to pass along the good will to our neighbor and bake her a coffee cake.
I chose a new recipe from my Grand Central Baking Book.  My plan was to split the recipe usually intended for a 9 x 13 pan into two smaller square pans so I could keep one at home and bring one to her.  But, the day I started baking I discovered that my ingredients were short and I was forced to halve the recipe.  The list of ingredients, fresh blueberries and soft, thick crumble atop the cake seemed to promise a sure thing.  But, as the cake was cooling and the aroma filled the house, I gained a sliver of doubt.
What if is was dry?  What if it isn’t a very good recipe?  I would hate to welcome the new neighbors with a subpar performance.  I better sample… just a nibble.  Oh wait, I can’t bring over a cake with a piece cut out.  I might as well just eat a small square.  Wow.  This is good cake.  I bet it would taste even more perfect alongside a cup of hot coffee. [brew coffee]  Why yes… yes it does taste unbelievable.  This must be the best sour cream coffee cake recipe I have ever made.
Not a morsel of that cake made it past my threshold.  In my head it felt wrong but for my taste buds and tummy it felt oh so right.  She will never miss what she didn’t know she was getting? *Sigh*
Sour Cream Coffee Cake
from The Grand Central Bakery
Streusel
1/2 cup cold unsalted butter
1/2 cup granulated sugar
1 cup (7 ounces) packed light brown sugar
1/2 cup all-purpose flour
Pinch of slat
3/4 cup rolled oats
Coffee Cake
3 cups all-purpose flour
3/4 cup granulated sugar
1 Tablespoon baking powder
1 teaspoon salt
4 eggs
3/4 cup unsalted butter, melted and slightly cooled
1 teaspoon vanilla extract
1 1/2 cups sour cream
2 cups diced fresh fruit, berries or rhubarb
Preheat oven to 350 degrees. Lightly grease and flour a 9 x 13 inch baking pan.
Make the streusel: Dice the butter into 1/4 to 1/2 inch cubes, then combine it with the granulated and brown sugars, flour and salt. Use two knives, a pastry blender, or your fingers to mix the ingredients until crumbly, then mix in the oats. If you’re making the streusel ahead of time, cover and store in fridge until ready to proceed.
Sift the flour, sugar, baking powder and salt into a bowl with high sides. Make a well in the center. In another bowl, lightly whisk the eggs, butter and vanilla together. Pour the mixture into the well, then add the sour cream by evenly distributing large spoonfuls around the edges of the dry ingredients. Gently mix the batter using a large spatula to fold the dry ingredients into the wet ingredients. Use big, slow, circular strokes that scrape the bottom and sides of the bowl with each motion. Don’t worry if the batter appears slightly lumpy, or if there are streaks of sour cream. The delicate texture of this batter is achieved through minimal mixing. (Some small patches of flour may still be visible, that is okay. It will be absorbed during the baking process.)
Scrape the batter into the prepared pan. Distribute the fruit in an even layer over the batter, then sprinkle evenly with the streusel. Bake for 45 minutes rotating the pan halfway through the baking time. The streusel should be crunchy and brown and a skewer inserted in the center should come out clean. Serve straight from the oven with plenty of fresh, piping hot coffee.


taken by : http://whippedtheblog.com/2010/08/03/sour-cream-coffee-cake/